.avif)

Shopify Store Locator: AI-Powered, SEO-Ready, Zero Code
Everything you need from a Shopify store locator
AI Content Assistant
Stop writing location descriptions by hand. MapCosmos generates engaging, SEO-optimized content for every store, including local keywords, opening hours context, and product highlights, in seconds.
One-snippet embed
Copy one HTML snippet into your Shopify theme. No apps, no extensions, no developer needed. Your store locator is live in minutes and compatible with every Shopify theme.
150+ no-code customization options
Control layout, colors, map styles, filters, fonts, languages, and currencies. Every detail of your store locator can be tailored to match your brand, with no design experience or coding required.
Dedicated SEO pages for every location
Each store gets its own indexed page with AI-generated metadata, schema markup, and local keywords. Your locations start appearing in local search results, driving organic traffic without additional ad spend.
Rich location content and media
Showcase products, services, live reviews, photo galleries, team bios, downloadable menus or flyers, and custom map markers. Turn every location page into a conversion tool, not just a map pin.
Real-time analytics and live data sync
See exactly what customers search for, which locations get the most views, and where drop-off happens. Connect your CRM or inventory system to keep all location data accurate and up to date automatically.
Launch your Shopify store locator today
Hundreds of Shopify merchants already use MapCosmos to turn local intent into revenue. Start your free trial today and have your store locator live before the end of the day.
How to Add a Store Locator to Shopify
Shopify is one of the world’s leading e-commerce platforms, trusted by businesses in over 175 countries.
It’s not just a platform to sell products online, it’s an ecosystem that helps brands connect with customers globally through seamless design, payments, and growth tools.
👉 In fact, many MapCosmos users are also Shopify merchants.
If you're interested in how AI is changing the way customers discover physical store locations, you can read more in our article about why every e-commerce brand will rely on AI-powered store locators in 2026.
Why use a store locator on your Shopify store?
The MapCosmos Store Locator for Shopify is a powerful widget that makes it easy for your customers to find your physical locations.
Whether you run retail shops, service points, or partner resellers, the store locator turns your Shopify site into an interactive hub where visitors can:
✅ Discover nearby stores instantly
✅ Filter by products, services, or categories
✅ Get one-click directions (Google or Apple Maps)
✅ Access extra info such as parking, accessibility, or downloadable PDFs
With a focus on performance, usability, and mobile optimization, MapCosmos helps you engage customers, boost foot traffic, and strengthen trust in your brand.
Let’s see how to add a custom store locator to Shopify — step by step.
1. Set up an account
Go to MapCosmos.com and log in or create a free account.
2. Add or import your locations, products, categories, and services
You can manually add entries or use the bulk import tool to upload a CSV/Excel file.
💡 Pro Tip: Field Mapping During Data Import
Field mapping ensures your imported columns (e.g., Name, Address, Services) line up perfectly with MapCosmos fields. This guarantees each piece of data appears in the right place on your locator.
👉 Read more about importing data in our article "How to Import Locations into Your Store Locator with MapCosmos (Manual, CSV, API)"
4. Add custom fields
You can go beyond the basics with additional details, such as: parking availability, accessibility info, downloadable PDFs (price lists, catalogs, brochures).
5. Get the installation code
From your MapCosmos dashboard, open your widget and click “Installation Code” in the settings.
Copy the embed code provided.

6. Add the store locator to Shopify
1. In Shopify dashboard, go to the website editor:
Online Store → Themes → Customize

2. Click Add section where you want to add your MapCosmos widget → then find Custom liquid option.
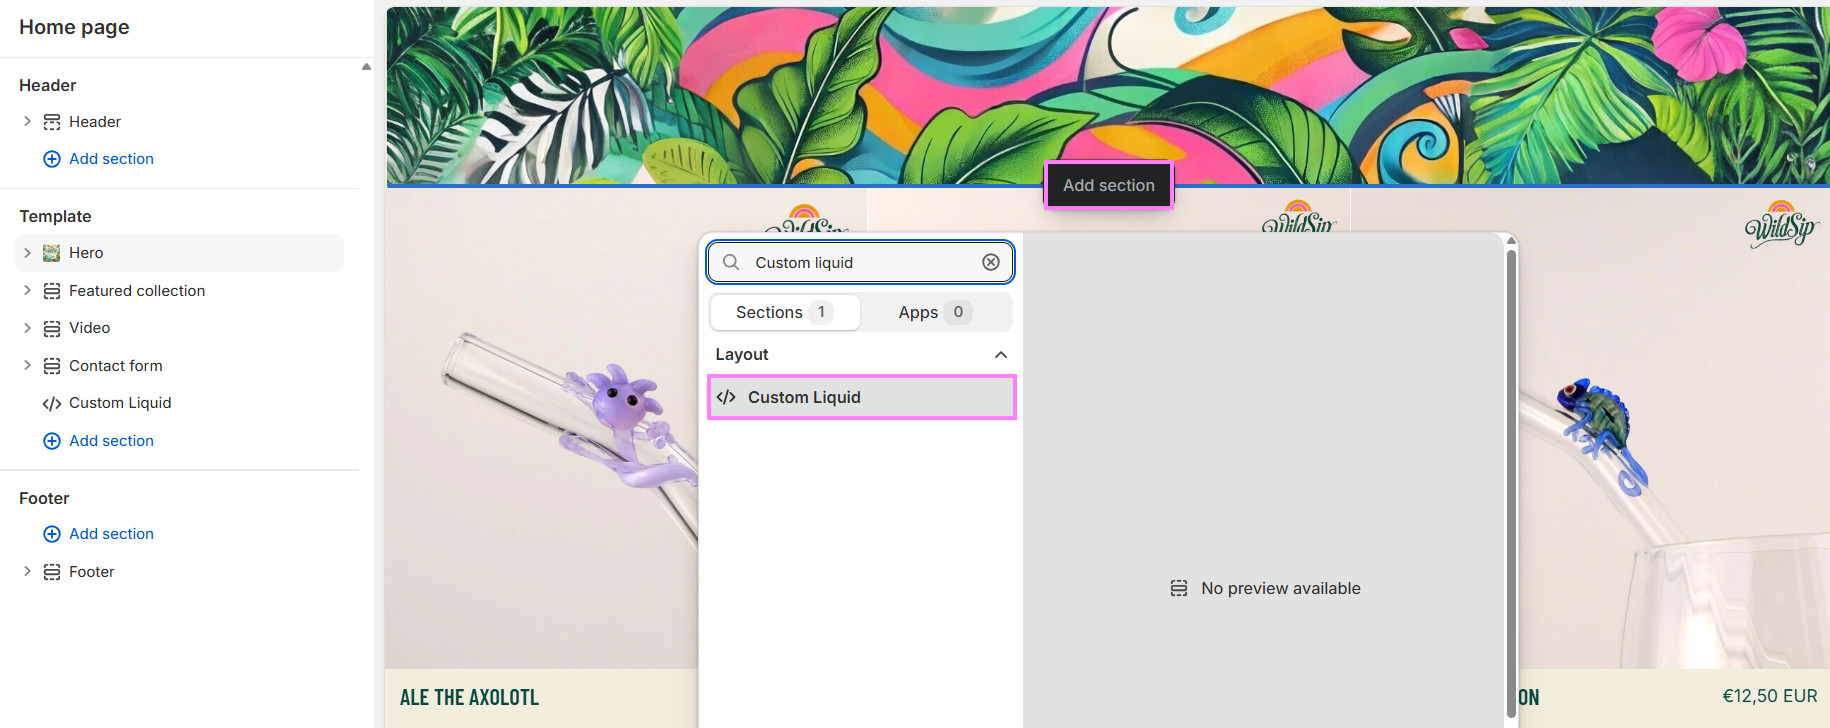
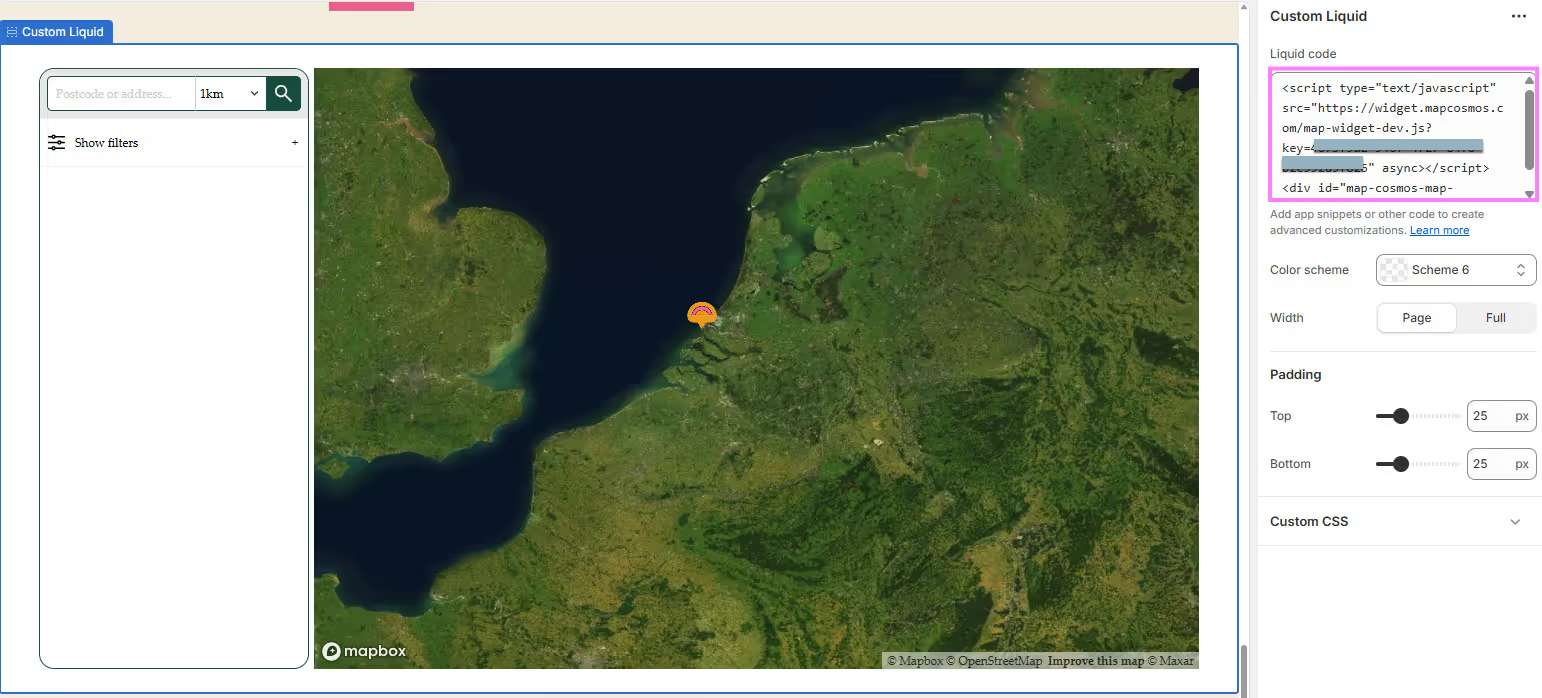
3. Paste the MapCosmos embed code you copied earlier into the newly opened window.
You can also adjust the colour scheme of this section to match your brand and the widget.
Save and publish - You’re done! 🚀
You’ve now successfully added a fully responsive, mobile-friendly store locator to your Shopify store.
Now your visitors can:
✅ Find the nearest store with just a few clicks
✅ Get real-time directions on mobile
✅ Search by products, categories, or services
✅ Access detailed info and downloadable resources
✅ Connect more closely with your brand offline
See how MapCosmos can power your Shopify store with an AI-powered store locator in minutes.
Shopify store locator - frequently asked questions
Everything Shopify merchants need to know before getting started.
🚀 Get started with MapCosmos for free today and add a powerful, personalized store locator to your Shopify store in minutes.