.avif)

ExpressionEngine Store Locator: AI-Powered, SEO-Ready, Zero Code
Everything you need from a ExpressionEngine store locator

AI Content Assistant
Stop writing location descriptions by hand. MapCosmos generates engaging, SEO-optimized content for every store, including local keywords, opening hours context, and product highlights, in seconds.

One-snippet embed
Add MapCosmos to any ExpressionEngine page, block, or template with a single HTML snippet. No modules to install, no database migrations, no developer overhead.

150+ no-code customization options
Control layout, colors, map styles, filters, fonts, languages, and currencies. Every detail of your store locator can be tailored to match your brand, with no design experience or coding required.

Dedicated SEO pages for every location
Each store gets its own indexed page with AI-generated metadata, schema markup, and local keywords. Your locations start appearing in local search results, driving organic traffic without additional ad spend.

Rich location content and media
Showcase products, services, live reviews, photo galleries, team bios, downloadable menus or flyers, and custom map markers. Turn every location page into a conversion tool, not just a map pin.

Real-time analytics and live data sync
See exactly what customers search for, which locations get the most views, and where drop-off happens. Connect your CRM or inventory system to keep all location data accurate and up to date automatically.
Launch your ExpressionEngine store locator today
Whether you run a small ExpressionEngine site or a large multi-site network, MapCosmos scales with you. Start your free trial and launch your store locator today.
Adding a MapCosmos Store Locator to Your ExpressionEngine Site
This guide will walk you through the process of adding a MapCosmos store locator to your ExpressionEngine website. By the end of this walkthrough, you will have a beautiful map that makes it easy for your customers to find your physical locations, boosting your local engagement and driving foot traffic.
Let's get started.
Step 1: Preparing Your MapCosmos Widget
Before we touch ExpressionEngine, we first need to set up your store locator in the MapCosmos dashboard and get the installation code.
- 1.1 Add Your Locations You can add your store locations one by one or use the bulk import tool to upload a CSV or Excel file.
- 1.2 Customize the Look Next, tailor the design of the locator to match your website’s theme. You can adjust the colors, fonts, and layout so it feels completely on-brand.
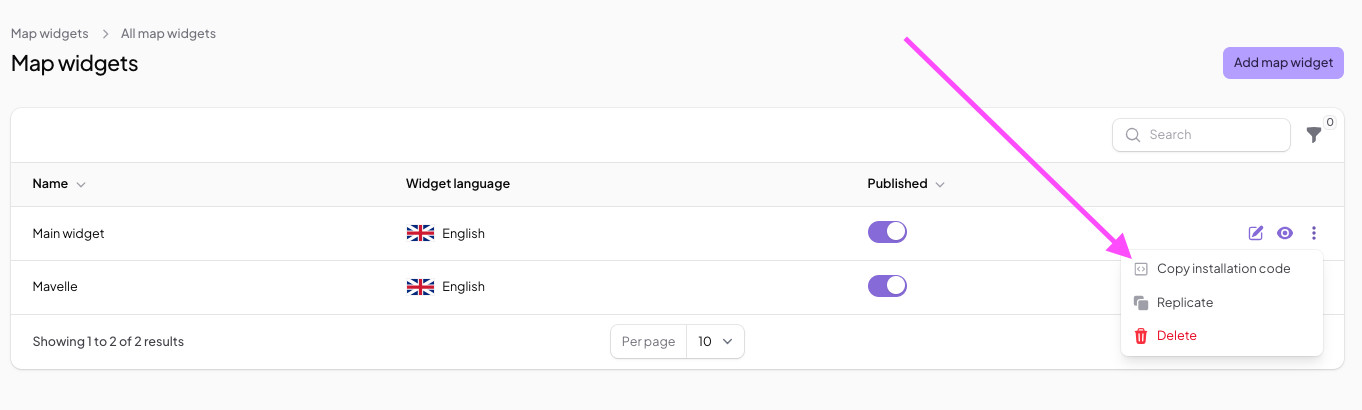
- 1.3 Copy the Installation Code Once you are happy with your map, open your widget in the dashboard and click “Copy installation code”.
Step 2: Placing the MapCosmos Map in ExpressionEngine
Now that we have the code, let's add it to your website.
- 2.1 Create a New Template Log in to your ExpressionEngine Control Panel. Navigate to the Template Manager and create a new template for your store locator page.
- 2.2 Paste the Embed Code Open your new template file. In the main content area, simply paste the installation code you copied from MapCosmos. Save the template.
- 2.3 View Your Live Map Navigate to your new page on the front end of your website. You should now see your fully interactive store locator.
That’s it! If you have any questions about how to integrate the MapCosmos store locator into your page, contact us at contact@mapcosmos.com or schedule a 30-minute demo.