.avif)

BigCommerce Store Locator: AI-Powered, SEO-Ready, Zero Code
Everything you need from a BigCommerce store locator
AI Content Assistant
Stop writing location descriptions by hand. MapCosmos generates engaging, SEO-optimized content for every store, including local keywords, opening hours context, and product highlights, in seconds.
One-snippet embed
Copy one HTML snippet into your BigCommerce theme. No apps, no extensions, no developer needed. Your store locator is live in minutes and compatible with every BigCommerce theme.
150+ no-code customization options
Control layout, colors, map styles, filters, fonts, languages, and currencies. Every detail of your store locator can be tailored to match your brand, with no design experience or coding required.
Dedicated SEO pages for every location
Each store gets its own indexed page with AI-generated metadata, schema markup, and local keywords. Your locations start appearing in local search results, driving organic traffic without additional ad spend.
Rich location content and media
Showcase products, services, live reviews, photo galleries, team bios, downloadable menus or flyers, and custom map markers. Turn every location page into a conversion tool, not just a map pin.
Real-time analytics and live data sync
See exactly what customers search for, which locations get the most views, and where drop-off happens. Connect your CRM or inventory system to keep all location data accurate and up to date automatically.
Launch your BigCommerce store locator today
Hundreds of BigCommerce merchants already use MapCosmos to turn local intent into revenue. Start your free trial today and have your store locator live before the end of the day.
BigCommerce Store Locator - Add a Location Finder in Minutes
Adding a bigcommerce store locator to your website is one of the fastest ways to connect your online visitors with your physical locations. With the MapCosmos Store Locator for BigCommerce, you can create a seamless experience that helps customers find stores, get directions, and engage with your brand offline -all in just a few steps.
Why use a store locator on your BigCommerce store?
A modern store locator isn’t just a map. It’s a powerful tool for customer experience, conversions, and local SEO.
With MapCosmos, your visitors can:
- Find the nearest store or service point instantly
- Get directions via Google Maps or Apple Maps
- Filter locations by products, services, or categories
- View detailed store info (hours, parking, accessibility, downloads)
Customer Benefits
- Reduce friction in the buying journey
- Increase in-store visits and conversions
- Build trust with accurate, real-time location data
- Improve mobile experience for on-the-go users
Local SEO Advantage
Each location can act as a searchable local landing point, helping your business:
- Rank for “near me” searches
- Improve visibility in local search results
- Drive high-intent traffic to physical stores
With full customization, mobile optimization, and fast performance, MapCosmos helps bridge the gap between your online store and offline experience.
Let’s see how to add a custom store locator to BigCommerce - step by step.
1. Set up an account
Go to MapCosmos.com and log in or create a free account.
2. Add or import your locations, products, categories, and services
You can manually add entries or upload a CSV/Excel file with all your locations.
💡 Pro Tip: Field Mapping During Data Import
Field mapping ensures your imported file’s columns (e.g., Store Name, Address, Hours) are matched correctly to MapCosmos fields.
- The system will detect your headers (like “City”, “Phone”, “Services”)
- You simply match them to the right field (e.g., Address → address, Opening hours → hours)
- Confirm and finish import
👉 Read more about importing data.
3. Customize your widget
Style your store locator in MapCosmos so it matches your BigCommerce theme:
- Colors, fonts, and layout
- Map provider (Google Maps or Mapbox)
- Default zoom and region
- Filters, categories, and language
4. Add custom fields
You can add extra details for each store, such as:
- Parking availability
- Accessibility information
- Distance from transit hubs
- PDF downloads (price lists, menus, brochures)
- Tags for special services (e.g., “pickup”, “vegan options”, “24/7”)
These details help your customers make faster, more confident choices.
5. Get the installation code
From your MapCosmos dashboard:
- Go to your widget
- Click Installation Code
- Copy the embed code

6. Add the store locator to BigCommerce
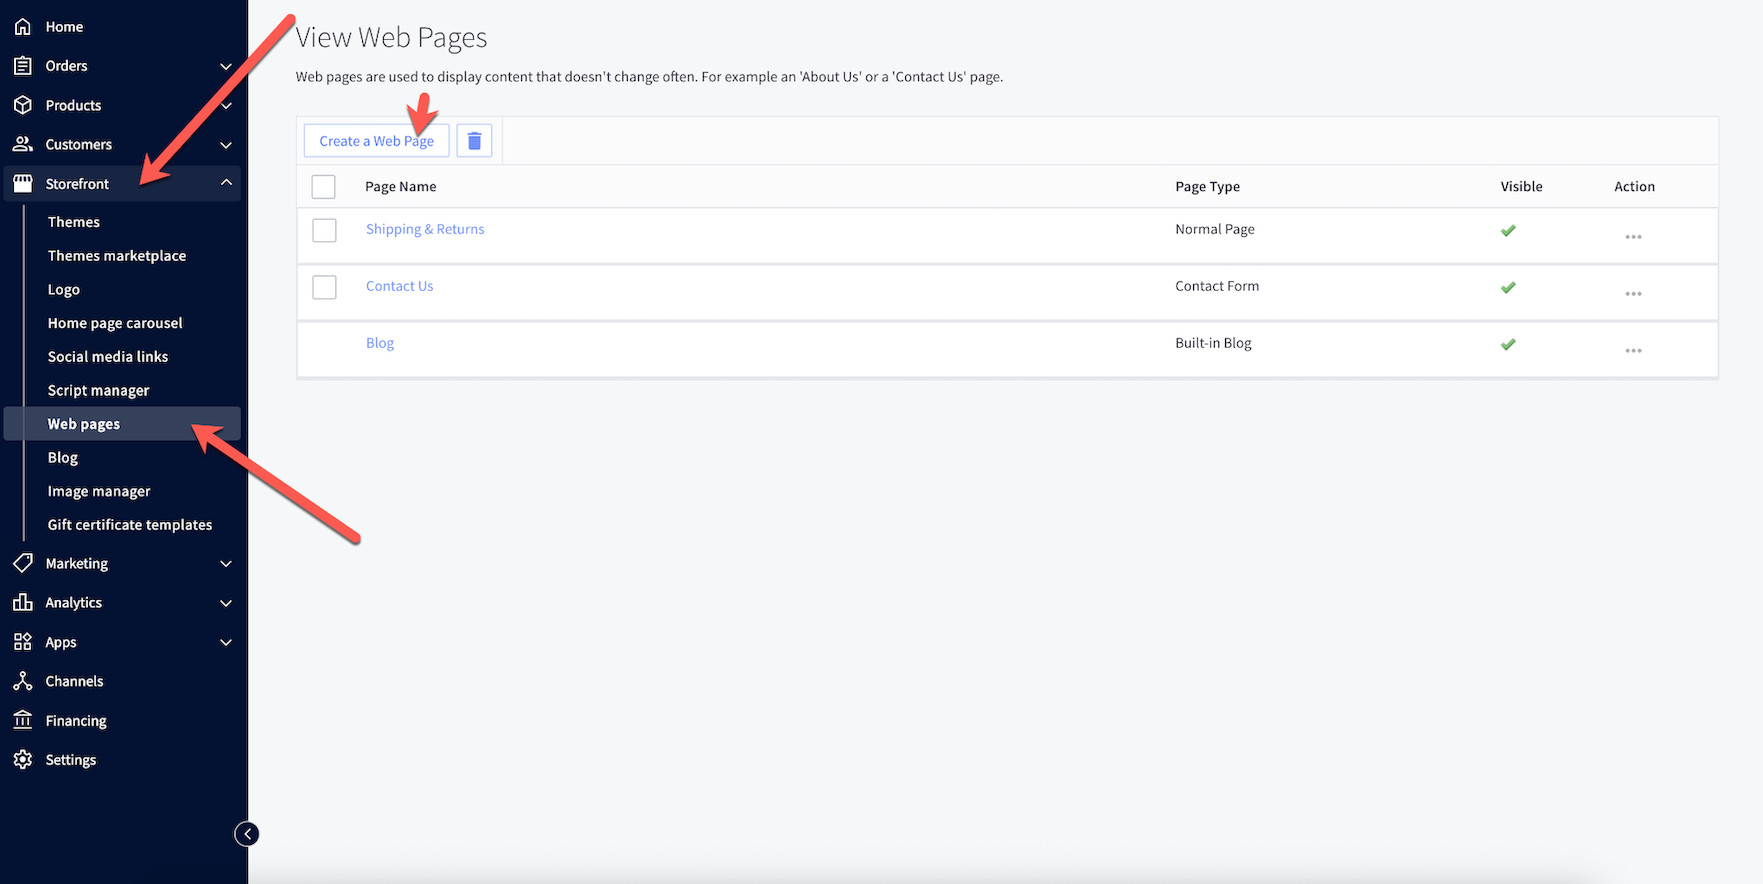
1. In your BigCommerce Admin, go to Storefront → Web Pages
2. Click Create a Web Page
3. Give it a title like Store Locator/Where to find us/etc..
4. Under Page Type, choose Contain content created using the WYSIWYG editor below
5. Scroll down to Page Content and switch to the HTML view (<>) in the editor

6. Paste the embed code from MapCosmos

7. Save
Optional: Add the new Store Locator page to your navigation menu under Storefront → Navigation so customers can easily find it.
7. Save and publish — You’re done! 🚀
You’ve now successfully added a responsive, mobile-friendly store locator to your BigCommerce storefront.
Now your visitors can:
✅ Find the nearest location instantly
✅ Get real-time directions
✅ Filter by products, services, or categories
✅ Access downloads and detailed store info
✅ Connect with your team and your brand offline